2. cmdlets for FAST Search Server 2010 for SharePoint
FAST Search Server 2010
for SharePoint shell enables access to eight administrative and over 70
FAST search–related cmdlets. You can see a list of these cmdlets by
typing the following commands.
Get-Command -PSSnapin "AdminSnapIn";
@(Get-Command -PSSnapin "AdminSnapIn").count;
Get-Command -PSSnapin "Microsoft.FASTSearch.PowerShell";
@(Get-Command -PSSnapin "Microsoft.FASTSearch.PowerShell").count;
The following example and sample output shows the objects associated with the administrative and FAST Search Server for SharePoint cmdlets and the number of cmdlets per object that are available.
Get-Command -PSSnapin "AdminSnapin" | sort noun, verb | group noun
Count Name                      Group
----- ----                      -----
    1 CertificateHash           {Get-CertificateHash}
    1 CertificateHelper         {Get-CertificateHelper}
    1 FileHasAccess             {Get-FileHasAccess}
    1 FilesOnReboot             {Remove-FilesOnReboot}
    1 LsaPolicy                 {Set-LsaPolicy}
    2 Services                  {Remove-Services, Set-services}
    1 user                      {Set-user}
gcm -PSSnapin "Microsoft.FASTSearch.PowerShell" |
   sort noun, verb | group noun
Count Name                      Group
----- ----                      -----
    2 FASTSearchAdminDatabase   {Install-FASTSearchAdminDatabase, Uninstall-...
    1 FASTSearchConfiguration   {Set-FASTSearchConfiguration}
    4 FASTSearchContentColle... {Clear-FASTSearchContentCollection, Get-FAST...
    1 FASTSearchDocumentProc... {Get-FASTSearchDocumentProcessingPipeline}
    1 FASTSearchIPSec           {Set-FASTSearchIPSec}
    4 FASTSearchMetadataCate... {Get-FASTSearchMetadataCategory, New-FASTSea...
    3 FASTSearchMetadataCraw... {Get-FASTSearchMetadataCrawledProperty, New-...
    4 FASTSearchMetadataCraw... {Get-FASTSearchMetadataCrawledPropertyMappin...
    4 FASTSearchMetadataFull... {Get-FASTSearchMetadataFullTextIndex, New-FA...
    4 FASTSearchMetadataFull... {Get-FASTSearchMetadataFullTextIndexMapping,...
    4 FASTSearchMetadataMana... {Get-FASTSearchMetadataManagedProperty, New-...
    4 FASTSearchMetadataRank... {Get-FASTSearchMetadataRankProfile, New-FAST...
....( not all output shown)
    1 FASTSearchSecurityWork... {Get-FASTSearchSecurityWorkerNode}
    3 FASTSearchSecurityXMLA... {Get-FASTSearchSecurityXMLAliaser, New-FASTS...
    3 FASTSearchSpelltuning     {Add-FASTSearchSpelltuning, Remove-FASTSearc...
    1 FASTSearchSpelltuningS... {Get-FASTSearchSpelltuningStatus}
Many of these objects will look
familiar to you, but with
the prefix FASTSearch in place of SPEnterpriseSearch. For example, the
object FASTSearchMetadataCrawledProperty looks similar to
SPEnterpriseSearchMetadataCrawledProperty. This is because FAST Search
Server for SharePoint shares many of the same functionalities as
enterprise search in SharePoint Server. You can get more information
about each cmdlet by using Get-Help and Get-Command. To obtain
information on the properties and methods of each object, pipe the
output from the cmdlet to select * or Get-Member.
Note:
MORE INFO
Microsoft has released substantial FAST planning and deployment
documentation, as well as documentation on FAST cmdlets. You can
download this documentation from the Microsoft download center at http://www.microsoft.com/downloads using the search keywords FAST 2010 PowerShell. The document “Optimize Search Relevance with
Microsoft FAST Search Server 2010 for SharePoint” also contains
examples of how to use cmdlets associated with the
FASTSearchMetadataRankProfile and FASTSearchMetadataManagedProperty
objects.
3. Adding FAST Search Server 2010 for SharePoint to a SharePoint 2010 Installation
After you have installed
the FAST Search Server for SharePoint and completed the initial
configuration, you must join the SharePoint 2010 installation with the FAST Search Server 2010 for SharePoint installation. The FAST Search servers are known as back-end servers
because users do not connect directly to them. The SharePoint Web
servers are the front-end servers. To join the Fast Search Server 2010
for SharePoint installation with
your SharePoint 2010 installation, you must first complete a number of
tasks. In the deployment documentation provided by Microsoft, you will
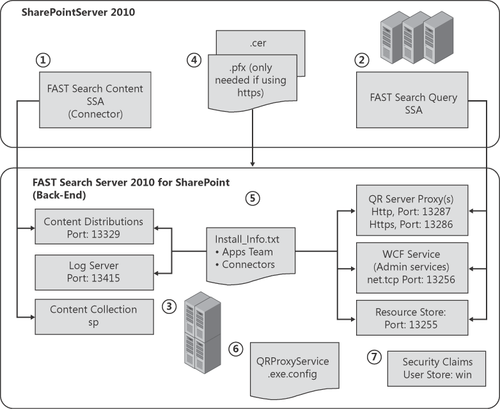
find that several of these tasks use Windows PowerShell commands. Figure 2 shows the components that are created or configured to complete the joining of the two installations.
The tasks you need to complete
are listed here in the order that they are presented in the Microsoft
deployment documentation. On the SharePoint Server installation,
complete the following steps.
Enable queries from SharePoint Server to FAST Search and crawling content with the content SSA by creating certificates on the SharePoint Server installation and copying them to FAST Search.
On the FAST Search Server for SharePoint installation, complete the following steps.
Enable Click-Through Relevancy to ensure that click-through relevancy data is transferred from SharePoint Server to FAST.
Import the certificate to all FAST query back-end servers.
The
default protocol to transfer query traffic is https. If you choose
http, then you will need to amend the QRProxyService.exe.config file.
Create FAST Search Authorization (FSA) on all FAST query back-end servers.
In the deployment
documentation, the two SSAs are created (steps 1 and 2 on the SharePoint
Server installation) using the SharePoint 2010 Central Administration
website; however, you can also accomplish these steps using Windows
PowerShell. To create the
two FAST SSAs, you will use the same cmdlets, except here you configure
them as the search application type ExtendedConnector. To complete the
process, you need information from the file Install_Info.txt. This file
was created on the FAST back-end server as part of the installation
process, and it is stored in the %FASTSEARCH% directory. The content of a
sample Install_Info.txt file is shown here.
===============================================================
FASTSearch: Installation Details
===============================================================
---------------------------------------------------------------
FAST Search Query Search Service Application configuration
---------------------------------------------------------------
Query Service Location HTTP (default):            http://W8R2BE01.contoso.msft:13287
Query Service Location HTTPS:                     https://W8R2BE01.contoso.msft:13286
Administration Service Location HTTP (default):   http://W8R2BE01.contoso.msft:13257
Administration Service Location HTTPS:            https://W8R2BE01.contoso.msft:13258
Resource Store Location:                          http://W8R2BE01.contoso.msft:13255
Account for Administration Service:               contoso\zzFASTuser
---------------------------------------------------------------
FAST Search Content Search Service Application configuration
---------------------------------------------------------------
Content Distributors (for PowerShell SSA creation):   W8R2BE01.contoso.msft:13391
Content Distributors (for GUI SSA creation):          W8R2BE01.contoso.msft:13391
Default Content Collection Name:                      sp
---------------------------------------------------------------
Other services
---------------------------------------------------------------
Log Server:             W8R2BE01.contoso.msft:13415
SQL Server database:
jdbc:sqlserver://sql.contoso.msft;DatabaseName=FASTSearchAdminDB;integratedSecurity=true
Note:
If you are unsure about which protocol or port number to use during the installation process, refer to the file QRProxyService.exe.config,
which is stored on every FAST back-end query server in the directory
%FASTSEARCH%\bin. This is the configuration file for the query service,
whereas the file Install_info.txt is for documentation purposes only
and, over time, it may not be a true representation of the FAST
installation.
3.1. Creating and Configuring the Content SSA
To create and configure the content SSA, open the SharePoint 2010 Management Shell and then follow these steps.
Check
the status of the Windows Server service, SPAdminV4, which has a
display name of SharePoint 2010 Administration. If the service is
stopped, start it by typing the following command.
Get-Service SPAdminV4 | Start-Service
Initialize
variables to store the names of the application pool to be used for the
SSA, the server name and port number for the content distributors, and
the content collection.
$AppPool = "FAST_Content_App_Pool"
$ContDist = "FASTBE01.contoso.msft:13391"
$contColl = "sp"
Create an SSA named FAST Search Content SSA by typing the following command.
$ssa = New-SPEnterpriseSearchServiceApplication "FAST Search Content SSA" `
   -SearchApplicationType "ExtendedConnector" -DatabaseServer "sql.contoso.msft" `
   -DatabaseName "FASTConnectorDB" -ApplicationPool $AppPool
Configure the Search Administration component.
$SearchInstance = Get-SPEnterpriseSearchServiceInstance SPS_APP1;
Set-SPEnterpriseSearchAdministrationComponent `
   -SearchApplication $ssa -searchserviceinstance $SearchInstance;
Set the connection information to the FAST Search Server for SharePoint Installation.
if (Get-SPEnterpriseSearchExtendedConnectorProperty -SearchApplication $ssa
-id "ContentDistributors" -ErrorAction SilentlyContinue)
{
  # Property exists
  Set-SPEnterpriseSearchExtendedConnectorProperty -ID "ContentDistributors" `
-Value $contDist -SearchApplication $ssa;
} else
{
  # Property does not exist
  New-SPEnterpriseSearchExtendedConnectorProperty -Name "ContentDistributors" `
    -Value $contDist -SearchApplication $ssa;
}
Name                                    Value
----                                    -----
ContentDistributors                     FASTBE01.contoso.msft:13391
Set
the Content Collection information. Assuming this property does not
exist, type the following command. A similar statement to the one shown
previously also could be constructed.
New-SPEnterpriseSearchExtendedConnectorProperty -Name "ContentCollectionName" `
   -Value $contColl -SearchApplication $ssa;
Name                                    Value
----                                    -----
ContentCollectionName                   sp
|
The if-else script block in
step 5 of the previous procedure is another example of a set of commands
that you will use repeatedly, both in the next step when you create and
configure the Query SSA and for other FAST service application
properties, such as the configuration of User Context properties. This
set of commands can be converted to a little helper function that you
can use to set or configure any of the extended properties, whether for a
FAST connector or a FAST query SSA property. The function takes
advantage of the consistent naming convention of the cmdlets and uses a
nice Windows PowerShell feature that allows you to build a string, which
is the name of a cmdlet or function that you can then run by prefixing
the string with the ampersand (&) character.
Function Set-FASTProp {
param ($SSA, [string] $Cmd, [string] $Prop, [string] $PropValue)
# Initialise $obj to Extended property object
$obj = "SPEnterpriseSearchExtended" + $cmd + "Property"
$GetProp = &("Get-" + $obj) -Sea $ssa -id $Prop -ErrorAction SilentlyContinue
  if ($GetProp)
  {
    # Property exists
    &("Set-" + $obj) -SearchApplication $ssa -ID $Prop -Value $PropValue
  } else {
    # Property does not exist
    &("New-" + $obj) -SearchApplication $ssa -Name $Prop -Value $PropValue
  }
} # End of Function Set-FASTProp
With this function, you would then use the following command for step 6.
Set-FASTProp $ssa "Connector" "ContentCollectionName" $contColl
To configure the extended User Context property, type a command similar to the following.
Set-FASTProp $ssa "Query" "FASTSearchContextProperties" $UserProp
where the variable $UserProp contains a comma-separated string of user specific properties, such as “SPS-Location, SPS-Responsibility, SPS-School”.
To list all the query Search Service Application properties, type the following command.
Get-SPEnterpriseSearchExtendedQueryProperty -SearchApplication $ssa
|
3.2. Creating and Configuring a Query SSA
To create and configure the query SSA, open the SharePoint 2010 Management Shell and use the following steps.
Initialize
variables to store the names of the application pool to be used for the
SSA, the server name and port number for the content distributors, and
the content collection.
$AppPool = "FAST_Content_App_Pool"
$SrvName = "://FASTBE01.contoso.msft:"
$QueryLoc = "FASTSearchQueryServiceLocation"
$QueryLocV = "https" + $SrvName +"13286
$AdminLoc = "FASTSearchAdminServiceLocation"
$AdminLocV = "https" + $SrvName + "13258"
$AdminUser = "FASTSearchAdminServiceAuthenticationUser"
$AdminUserV = "Contoso\zzFASTuser"
$ResLoc = "FASTSearchResourceStoreLocation"
$ResSLoctV = "http" + $SrvName + "13255"
Note:
The protocol and port
settings for the Query and Admin locations assume the use of https for
queries. For http, change the protocol and port numbers as detailed in
Install_Info.txt or QRProxyService.exe.config, created on the FAST Search Server at installation time.
Create an SSA named FAST Search Query SSA and set the default search provider, by typing the following commands.
$ssa = New-SPEnterpriseSearchServiceApplication "FAST Search Query SSA" `
  -SearchApplicationType "Regular" -DatabaseServer "sql.contoso.msft" `
  -DatabaseName "FASTQueryDB" -ApplicationPool $AppPool;
Set-SPEnterpriseSearchServiceApplication $ssa -DefaultSearchProvider "FASTSearch"
Set
the connection information to the FAST Search Server for SharePoint
Installation using the Windows PowerShell function defined earlier.
Set-FASTProp $ssa "Query" $QueryLoc $QueryLocV
Set-FASTProp $ssa "Query" $AdminLoc $AdminLocV
Set-FASTProp $ssa "Query" $AdminUser $AdminUserV
Set-FASTProp $ssa "Query" $ResUser $ResUserV
To verify the property values for the query SSA, type the following command:
Get-SPEnterpriseSearchExtendedQueryProperty -SearchApplication "FAST Search Query
SSA"